Step-By-step:

Today I was going through some pictures, procrastinating my writing, and came across a small bar I designed/installed and thought, how great was that! This compact bar has everything needed for storing and hosting plus it looks considerably more expensive then it is.

When Chris and I moved to Houston from Dickinson we had no clue what area to live in! Everyone we knew warned us to live in an area where all your essentials are within a mile or two from your house. The reason was to try and keep your errand running commute as short as possible; traffic in Houston makes the sanest person want to pull their hair out!
Chris is a small-town man! Before moving to Houston the largest “city” he lived in was Dickinson, ND. Most of you reading this are probably wondering, where in the heck is that?! Well, it is a “city” of less then 30,000 and has a tendency to be subzero for weeks at a time! Needless to say, my poor husband was in for an awakening moving to the fourth largest city in the United States!
We bought a house in Spring Branch across from green space rather then high-rise buildings with a “large yard”. When you’re done reading this hop over to my Step-By-Step: Guide to making the most out of your small backyard, you will laugh out load when you see the “large yard”.
Anyways, the house was new construction tract home that was perfect for our family! The main floor was all open (living, dining and kitchen). The kitchen was on the small side and knowing that we enjoy hosting adding a bar was at the top of the home improvement list! Space was tight but there was an area behind the living room sofa that was perfect for a dry bar!

At first I was disappointed in its small size but after completing the install we realized it really was the best dry bar! So clearly I felt obligated to share it with you!
Let’s get started! Step-By-Step:
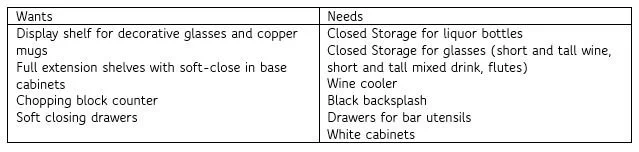
FIRST STEP: MAKE A NEEDS VS. WANTS LIST
This might seem like a no-brainer but honestly it is often an overlooked step! My first step to every project, personal or hired, is to make a needs/wants list. Writing down what you must have and what you desire to have gives you the starting point to the size and function of the design. Some things on my list were;
SECOND STEP: KNOW WHAT AND HOW YOU WILL USE YOUR SPACE
Once you’ve made your list of needs and wants envision how you will use the space and what will be stored.
For example, I will be storing 10-15 bottles of liquor, tall and short wine glasses, short and tall mix glasses, tall decorative mix glasses, copper mugs, a couple shakers, wine accessories, and miscellaneous utensils.
Our area only allowed us 5’-0” length and is positioned in front a low set window so my size was determined by the existing allotted space. To get the most efficient bar two base cabinets and a wine cooler worked perfectly. One cabinet with full extension roll out shelves for glasses and the other cabinet fixed shelf for liquor. And two full-extension soft-closing drawers. On the wall I added 5’ long floating shelf with metal hanging rail below.
THIRD STEP: SELECTING THE DESIGN AND STYLE
This is the fun part! And I am sure you already have something in mind and saved to a Pinterest board, which is perfect! When clients come to me I’ll ask them to share Inspirational photos, this shows their design style. But we all look at different parts of a photo. It is important to pick apart what exactly you like about the image. Is it the color of the cabinets? Hardware? Door/drawer combo? Cabinet panel type? Etcetera. Once you pick apart what you love your design style will be evident.

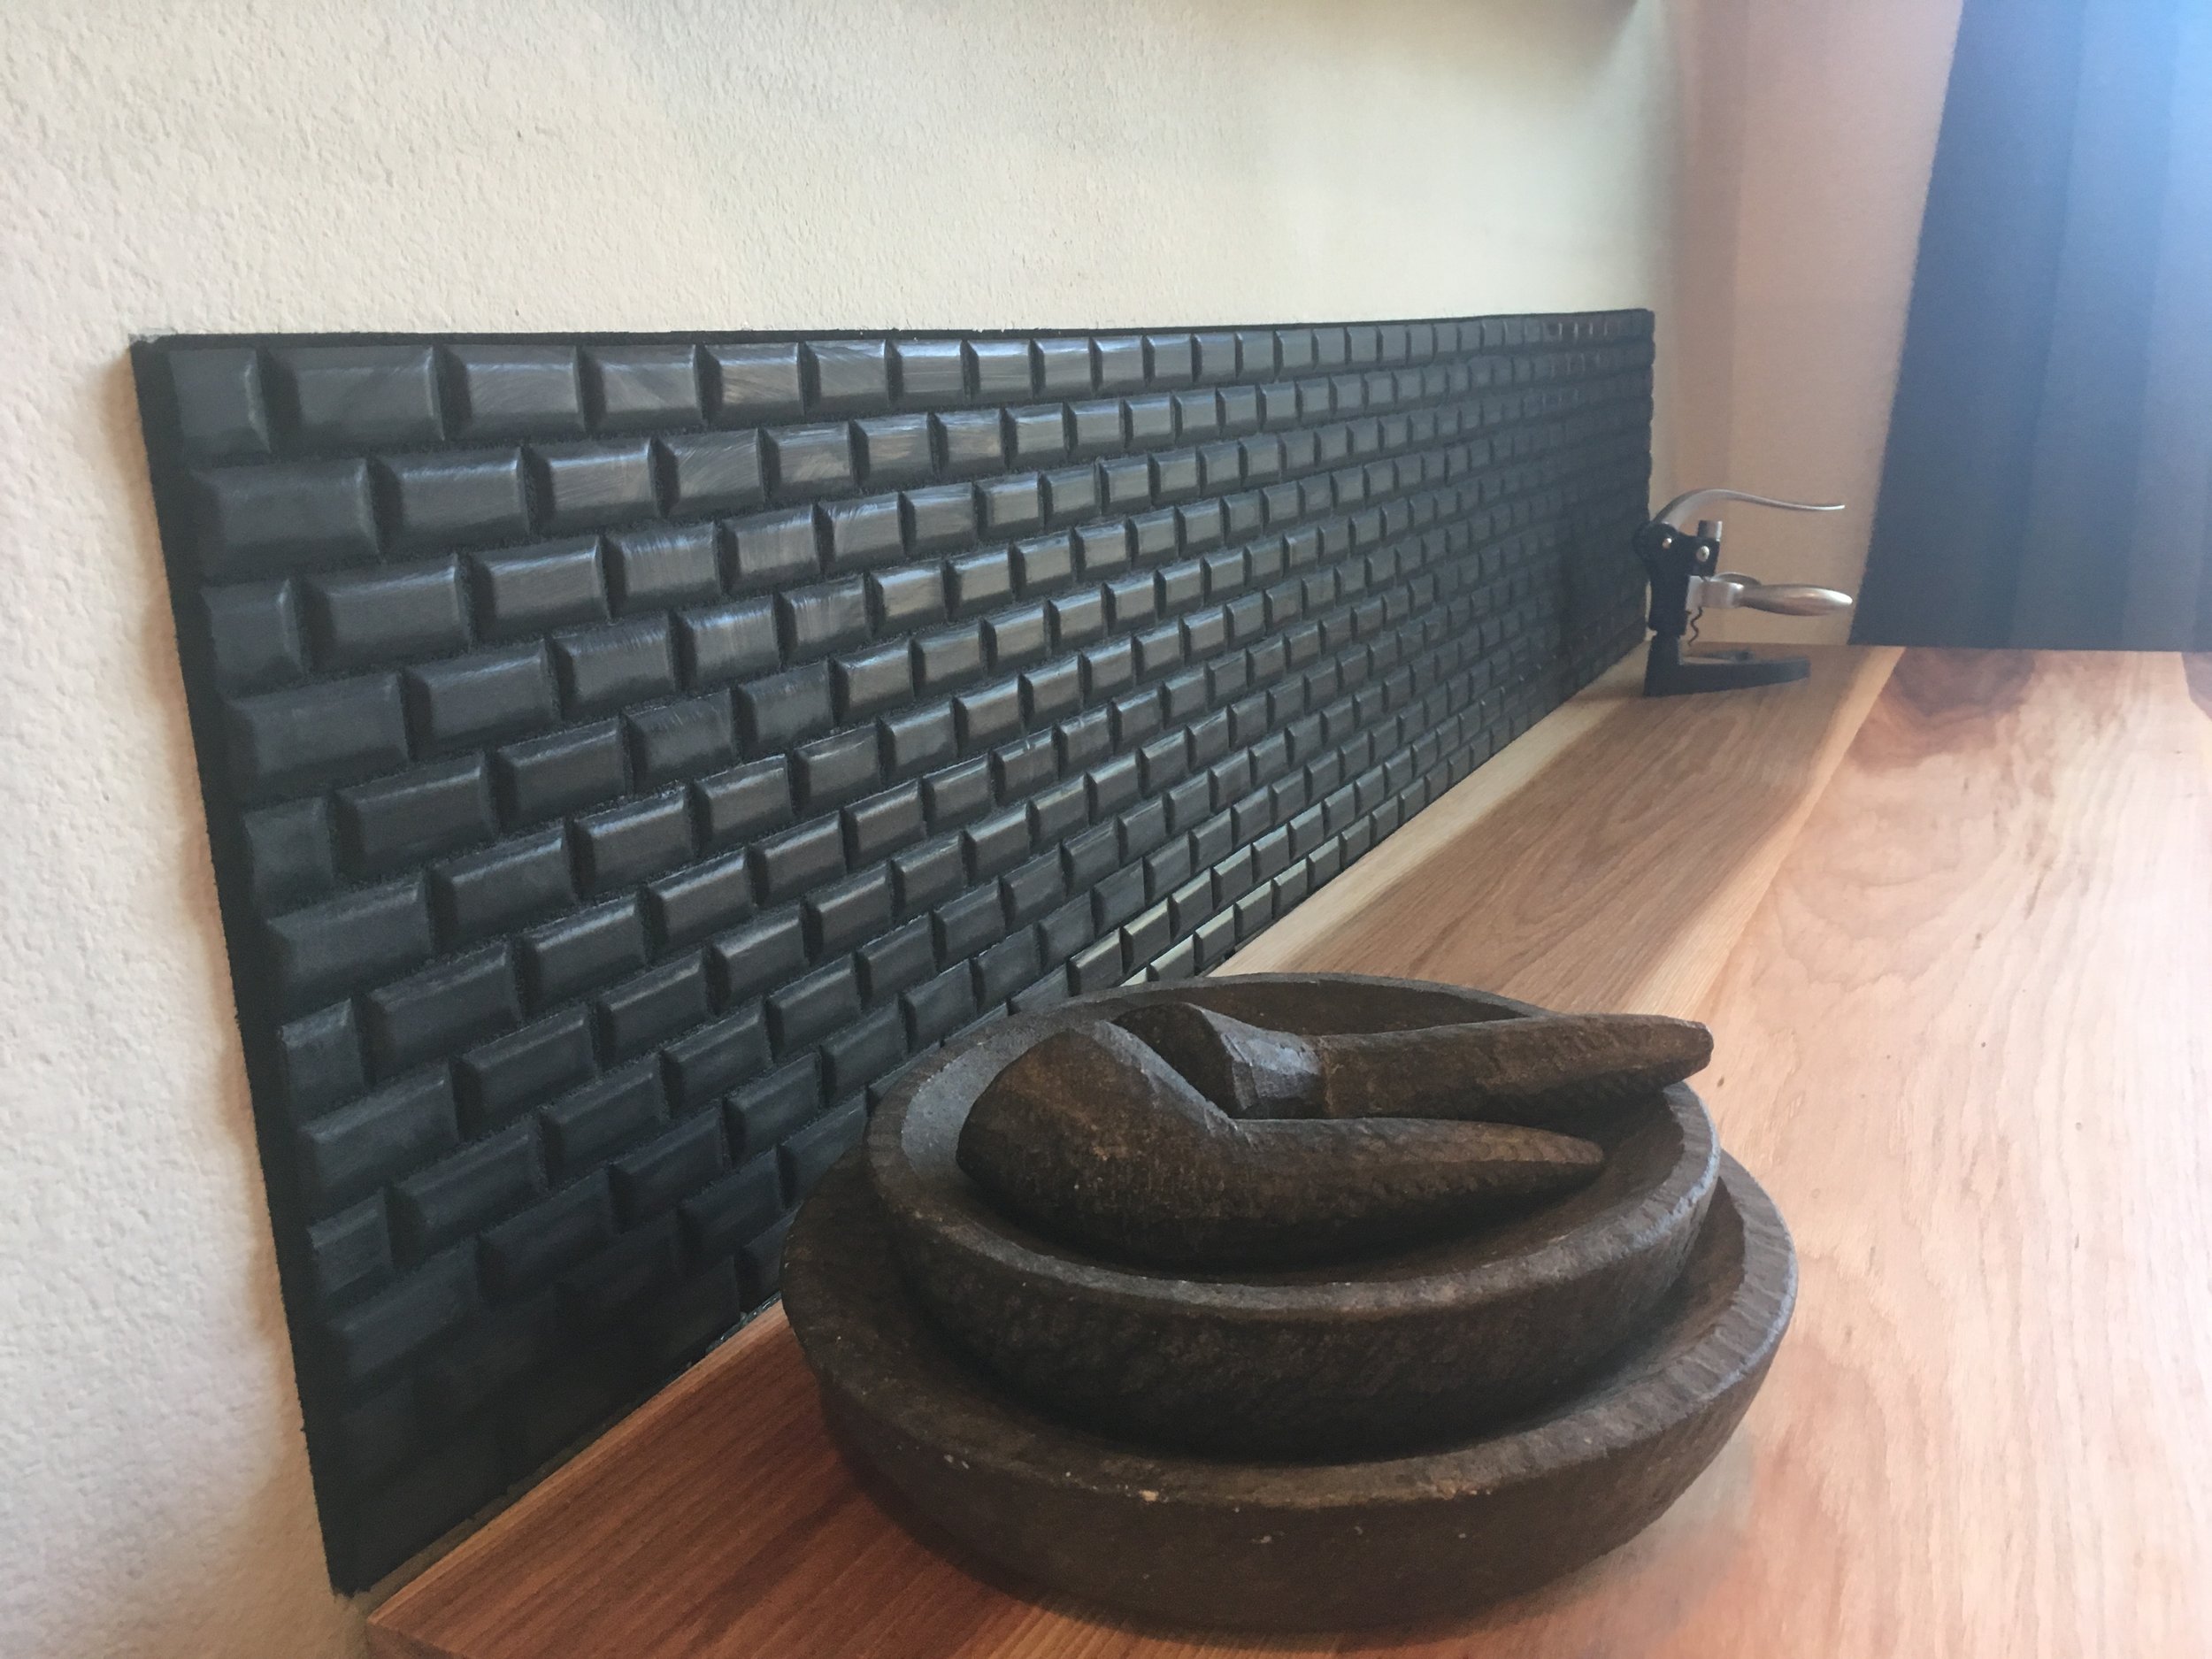
For our project I wanted to have opposing finishes to the kitchen, which was very dark stain nearly black cabinet with polished nickel linear hardware, light granite countertop and travertine backsplash. My personal style leans Scandinavian; I am fond of clean lines and enjoy mixing natural materials with bold juxtaposes. Our bar selections included; white paint white oak with black glazing to accentuate the wood grain, matte black linear hardware, maple wood slab chopping block countertop and matte black mini beveled edge subway backsplash. A floating shelf above to match the base cabinets and a d.i.y. hanging rail made from plumbing pipe and fittings.

FIFTH STEP: INSTALLATION
Whether you are hiring a professional or completing it yourself its going to get a little messy but one of the best parts about a project this size is it installs in no time! With the project being small I constructed our dry bar myself. Installation day for me is like Christmas for a 6-year-old! I lose sleep from excitement!
It took me about half a day to install the cabinets, due to some unexpected base board cutting. By the end of day all were in place with toe kick tacked and countertop strapped.
The following day I installed the floating cabinet and backsplash. (not going to lie, the beveled edges were a huge pain to grout! My fingertips were wrecked by the end of the day.
Tip: make the grout a little wetter then advised; this makes it more workable)

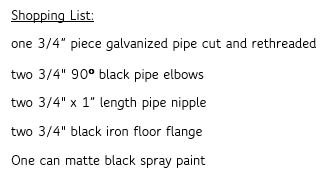
I let the backslash set for a day and installed the hanging rail the following morning. For this I purchased plumbing pipe and fittings from the hardware store.

I had the pipe cut to my 4’-6” length. If you do this be sure to get the cut end rethreaded so the elbow is able to connect to the pipe. Before putting everything together apply the first coat of paint to each piece. Once dry, assemble and apply one more coat of paint. Let it dry over night! My patience got the best of me and I was punished with fingerprints which added another step and drying time!
Before installing be sure all fittings are tight and that both flanges face the same direction, towards the wall. Screw to fasten and WALLA! you have the best small dry bar!
HAPPY HOSTING!
